Oak cabinets don’t have to feel dated. We at Dzala General Contractor have helped homeowners in Arlington, Vienna, and Tysons refresh their kitchens with smart oak kitchen cabinet remodel ideas that work within real budgets.
Whether you’re refinishing existing cabinets or upgrading hardware, the right updates make a measurable difference in how your kitchen looks and functions.
How to Modernize Oak Cabinets Without Painting Everything
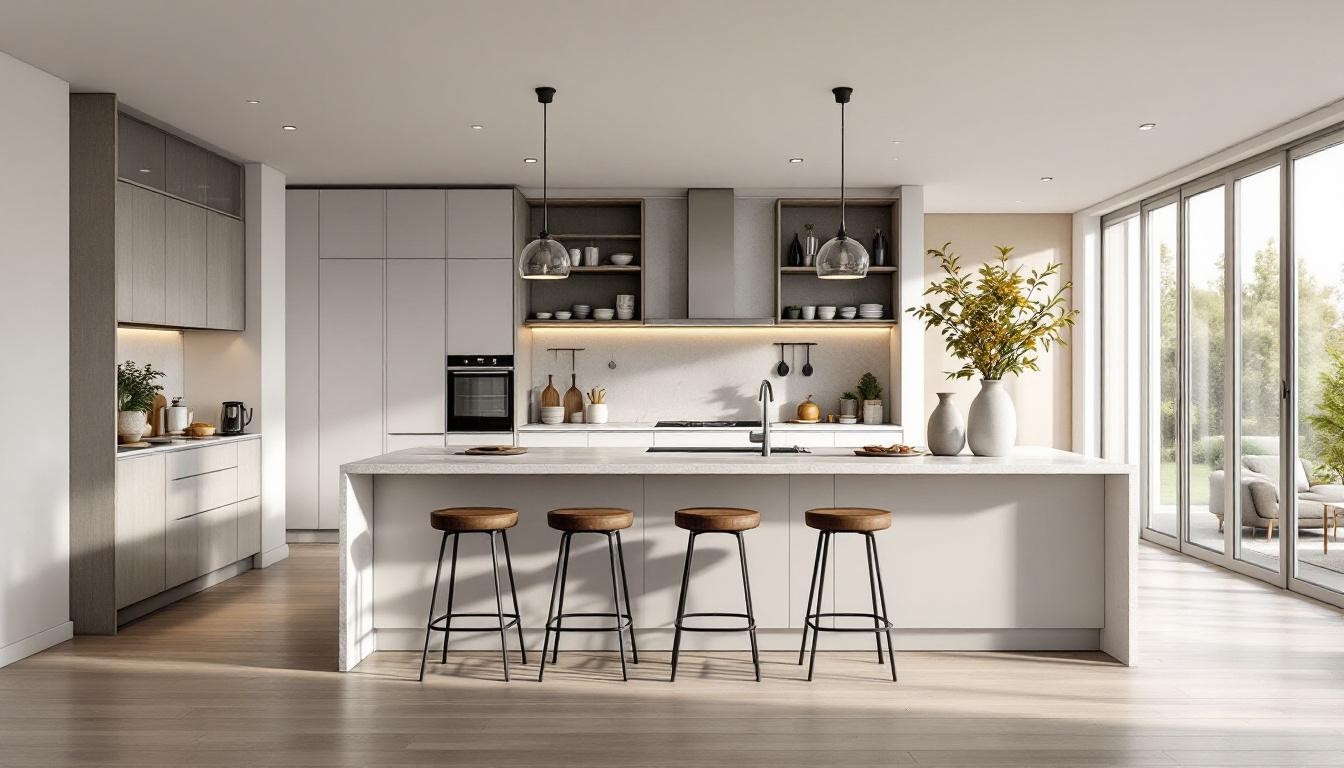
Refinishing oak cabinets starts with understanding what you’re working with. Oak grain is prominent and can read as dated when paired with the wrong finishes, but the wood itself is solid and worth keeping. A selective approach works better than painting everything: target the visible surfaces and consider your stain depth carefully. Dark stains like espresso or dark cherry work better for modern kitchens than the lighter honey tones that dominated the 1990s. Sand your cabinets thoroughly before applying any stain-this step determines whether your finish looks professional or rough. A satin or pearl sheen reduces grain visibility compared to glossy finishes, which matters if you want oak to feel contemporary rather than rustic. Start with one section like your island or lower cabinets if you’re hesitant about committing to a full refinish. This approach lets you test the stain color and sheen in your actual lighting before investing in the entire kitchen.
Hardware Creates Immediate Impact
Replacing cabinet hardware is the fastest way to shift oak from dated to current. Matte black handles and pulls create high-contrast modern lines against wood, while brushed nickel or polished nickel offer a cleaner, more elegant aesthetic. Cold metals like chrome flatten oak’s warmth, so avoid pairing them together. Warm metallics such as unlacquered brass or bronze complement oak’s natural tones and feel intentional rather than accidental. Coordinate the hardware finish with your faucet and light fixtures-mismatched metals create visual confusion. A kitchen in the Vienna area transformed dramatically with matte black hardware paired with a brushed nickel faucet and copper pendant lights, proving that intentional metal coordination matters more than any single product choice. Match your hardware style to your cabinet door profile; shaker-style doors accept modern hardware easily, while ornate cathedral profiles fight against contemporary aesthetics.
Strategic Lighting Reveals Oak’s Best Features
Under-cabinet lighting improves functionality and highlights oak grain, making the wood appear lighter and fresher. Warm LED strips installed beneath upper cabinets create a soft glow that softens oak’s orange undertones without expensive refinishing. Above the cabinets, larger pendant lights or modern fixtures shift the kitchen’s mood entirely. Copper or brass pendants warm the space while feeling current, and their scale matters-oversized fixtures read more sophisticated than small, timid ones. Recessed lighting in the ceiling provides task lighting while keeping the space open and airy. Homeowners in Arlington who combined under-cabinet warm LEDs with recessed overhead lighting found that their oak cabinets felt less heavy and more balanced with surrounding elements. Layer your lighting with under-cabinet, overhead recessed, and statement pendants to control the space’s warmth and brightness throughout the day.
These refinishing and hardware updates set the foundation for your kitchen’s transformation. The next step involves choosing a design style that complements your modernized oak cabinets and reflects how you actually live in your space.
Which Design Style Suits Your Modernized Oak Cabinets
Oak cabinets work with multiple design directions, but the pairing matters. Contemporary design strips away ornament and emphasizes clean lines, which means your oak hardware, countertops, and backsplash must follow suit. Matte black handles on oak cabinets signal contemporary intent, while warm metallics undercut that message. Pair modernized oak with quartz or marble countertops in light neutrals or bold charcoal tones, not busy patterns that compete with oak grain. A white or light gray subway tile backsplash keeps the focus on your refreshed cabinetry and updated fixtures. Homeowners in Arlington who chose this direction reported that their kitchens felt 40 percent larger because the light backsplash and countertops created visual breathing room.
Minimalism Complements Oak’s Natural Texture
Minimalism works well with oak because the wood itself provides texture and warmth that compensates for the absence of decorative details. Avoid open shelving unless you commit to curating what sits on those shelves-clutter destroys minimalist spaces faster than anything else. Keep upper cabinets closed, use recessed lighting instead of pendant statements, and let oak be your primary visual interest. This approach works especially well in smaller kitchens where every visual element counts.
Farmhouse and Rustic Aesthetics Enhance Oak Naturally
Farmhouse and rustic aesthetics actually pair better with oak than contemporary styles do, but the execution determines whether your kitchen feels authentic or kitschy. Warm metallics like unlacquered brass and bronze complement farmhouse oak naturally, and a light stain preserves the wood’s honey undertones without the dated 1990s feeling. Introduce texture through a natural stone or subway tile backsplash, open shelving with displayed glassware, and warm wood tones in your countertops or island. Homeowners in Vienna who selected this direction added copper pendant lights and warm-toned accessories like rattan or sisal textiles, creating cohesion without clutter.
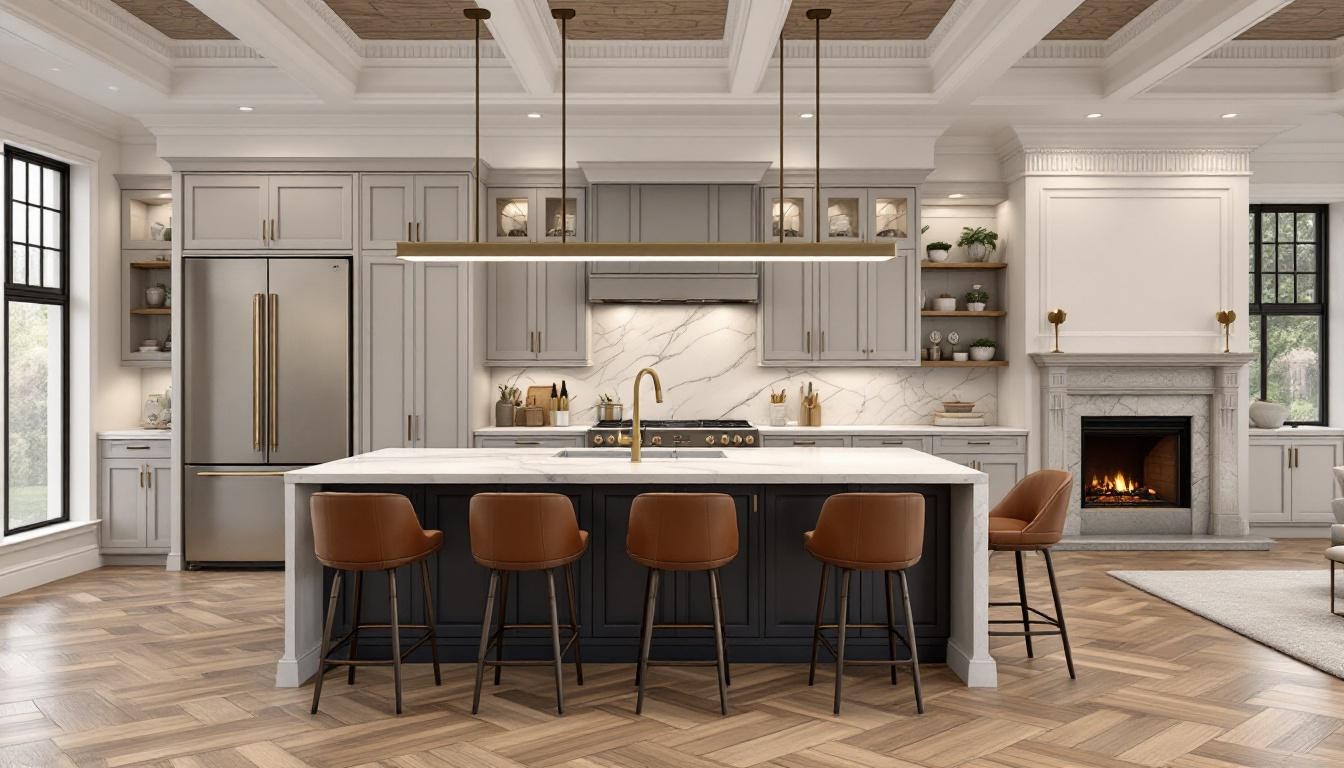
Traditional Kitchens Demand Intentional Choices
Traditional kitchens with oak work when you commit to classic hardware finishes like polished nickel, classic white painted uppers paired with stained oak lowers, or matching all cabinets in a deeper stain. This two-tone approach appeals to buyers in the Tysons market because it feels intentional rather than outdated. The key across all three styles is consistency-pick your metals, your countertop tone, your backsplash material, and your lighting finish, then ensure every element reinforces that choice.
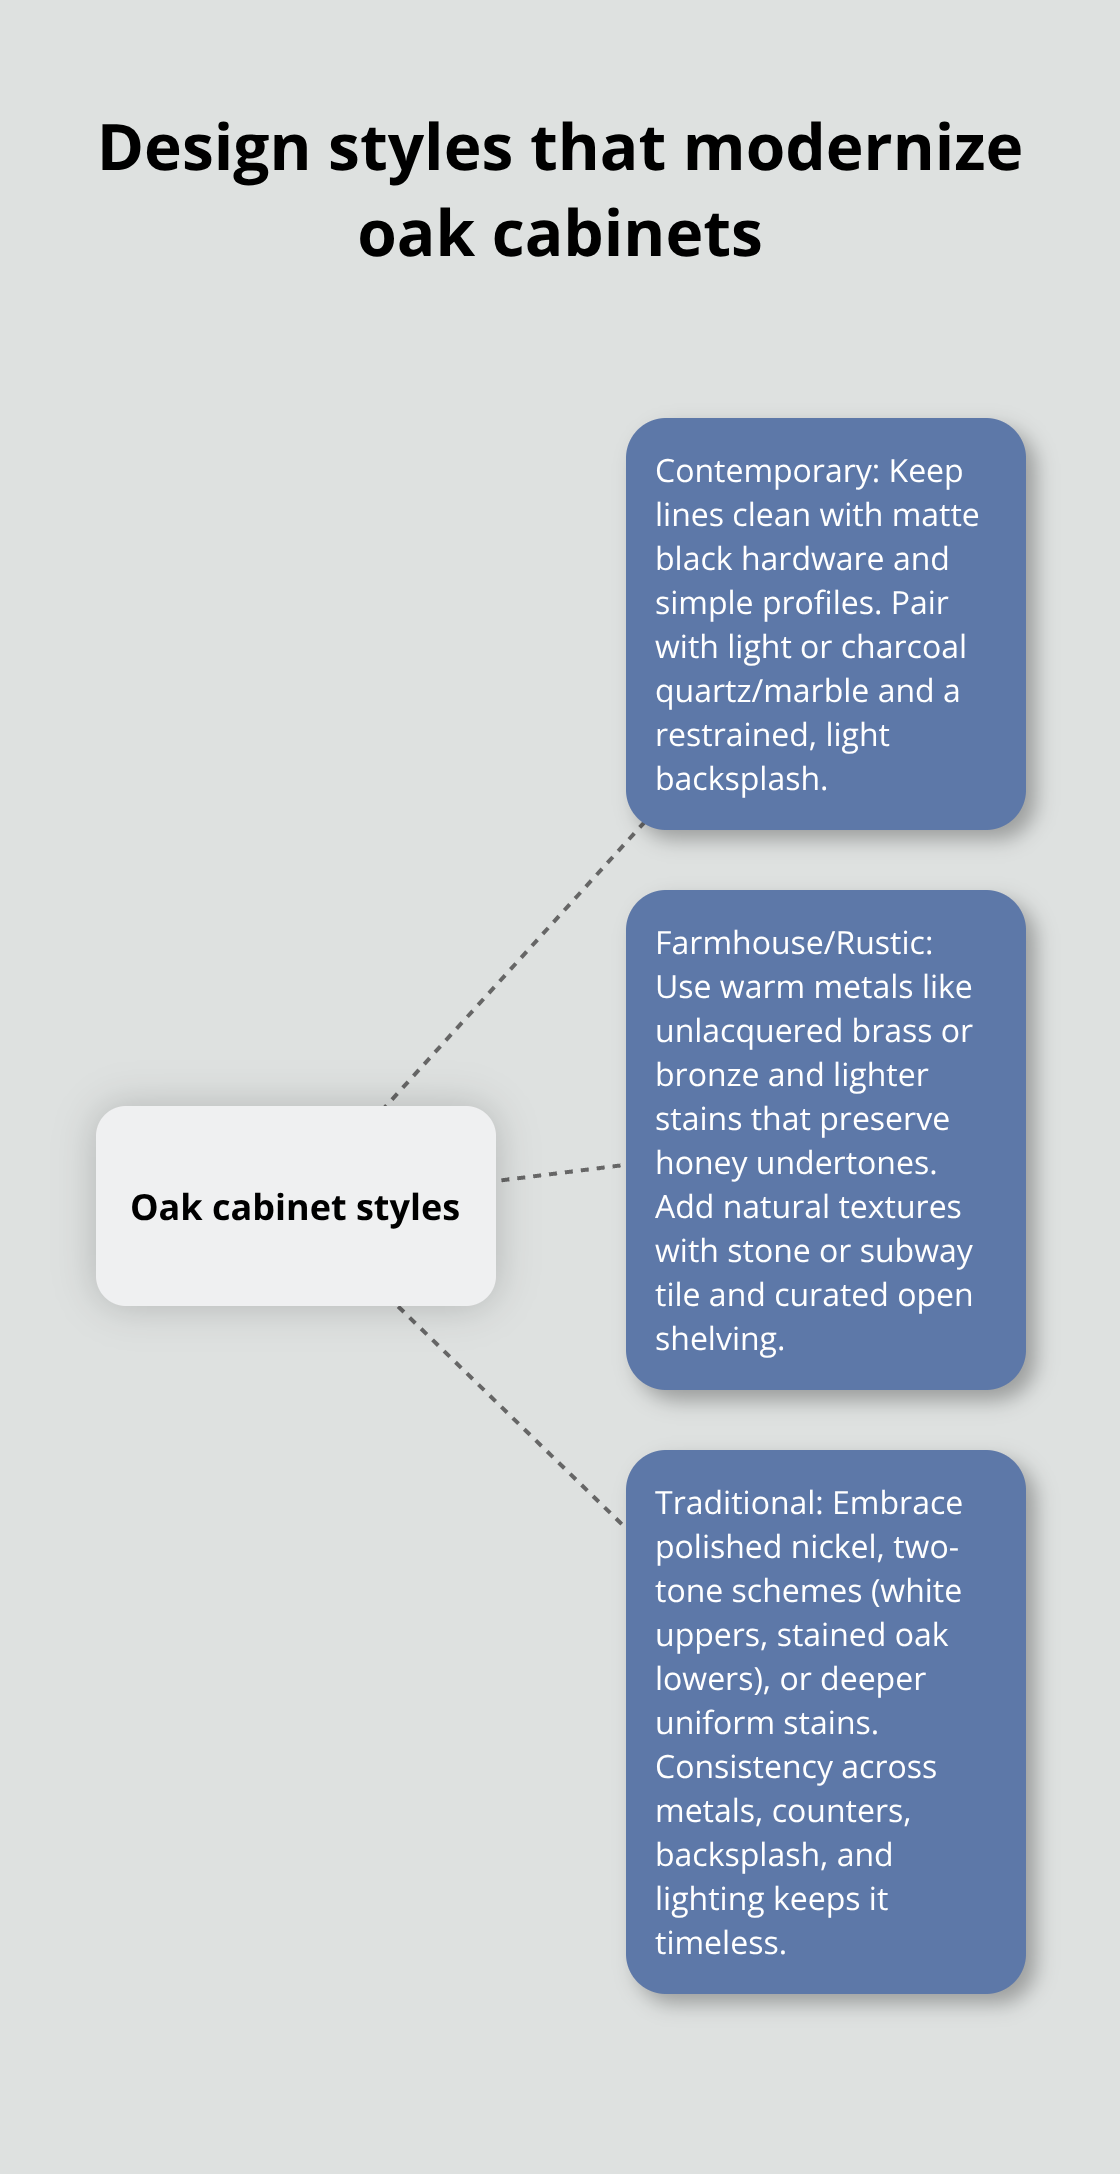
Oak’s versatility means you can achieve contemporary, farmhouse, or traditional results depending on what surrounds it, not the wood itself. Your design choice directly influences which remodeling strategies make the most financial sense, so understanding your preferred aesthetic helps you prioritize where to invest your budget.
How to Remodel Oak Cabinets Without Draining Your Budget
Refacing cabinet doors costs roughly 40 to 50 percent less than full cabinet replacement while delivering nearly identical visual results. Instead of replacing cabinet boxes, you replace only the doors and drawer fronts, then add new hardware and refinish exposed frame edges. This strategy works particularly well if your cabinet boxes are structurally sound but the doors look tired. In Arlington, homeowners who refaced oak cabinets with new shaker-style doors and updated hardware reported spending between $3,000 and $5,000 total, compared to $8,000 to $12,000 for complete cabinet replacement. The refaced cabinets functioned identically and looked completely refreshed because new doors with modern hardware shift the kitchen’s entire aesthetic. Refacing also eliminates the disruption of a full tearout, meaning your kitchen remains partially functional during the project rather than completely unusable for weeks.
Cabinet Refacing Amplifies Your Investment
You can combine refacing with selective staining of exposed frame edges and under-cabinet lighting to amplify the transformation without additional major costs. New doors with updated hardware create the visual impact of a complete overhaul while preserving your existing cabinet structure. This approach works especially well when your cabinet boxes remain solid and level-the visible transformation masks the fact that you kept the underlying infrastructure intact.
DIY Finishing Saves Labor Costs
Refinishing oak cabinet doors yourself saves labor costs, which typically represent 50 to 60 percent of total refinishing expenses. Sanding and staining doors at home works if you have adequate workspace, proper ventilation, and realistic expectations about timeline. Most homeowners underestimate the time required-sanding and staining all cabinet doors typically takes three to four weekends, not three to four days.

Vienna homeowners who tackled this project themselves spent roughly $400 to $600 on supplies like sandpaper, stain, and protective finishes but invested significant personal time. Professional cabinet refinishing runs $2,000 to $4,000 depending on kitchen size and stain complexity, so the financial savings are real but come with labor intensity.
Professional Installation Prevents Problems
Hardware replacement and under-cabinet lighting installation remain better left to professionals because improper installation creates functional problems and safety concerns. Electrical work for under-cabinet lighting requires proper wiring and code compliance, and incorrect hardware installation can damage cabinet doors or create alignment issues that affect functionality. The practical compromise involves hiring professionals for structural work while handling cosmetic finishing yourself if you have the space and patience.
Phasing Your Renovation Preserves Cash Flow
Spreading remodeling across multiple phases lets you invest in high-impact updates first, then add secondary improvements as budget allows. Phase one typically includes hardware replacement, under-cabinet lighting, and wall color updates-these three changes cost $800 to $1,500 combined and transform how oak cabinets read in your space. Phase two involves refinishing cabinets or refacing doors, which represents the largest single expense but can wait three to six months while you assess whether phase one changes alone satisfy your goals. In Tysons, many homeowners discovered that phase one updates alone made their kitchens feel sufficiently modern, eliminating the need for expensive cabinet work. Phase three addresses countertops and backsplash if your budget and timeline allow.
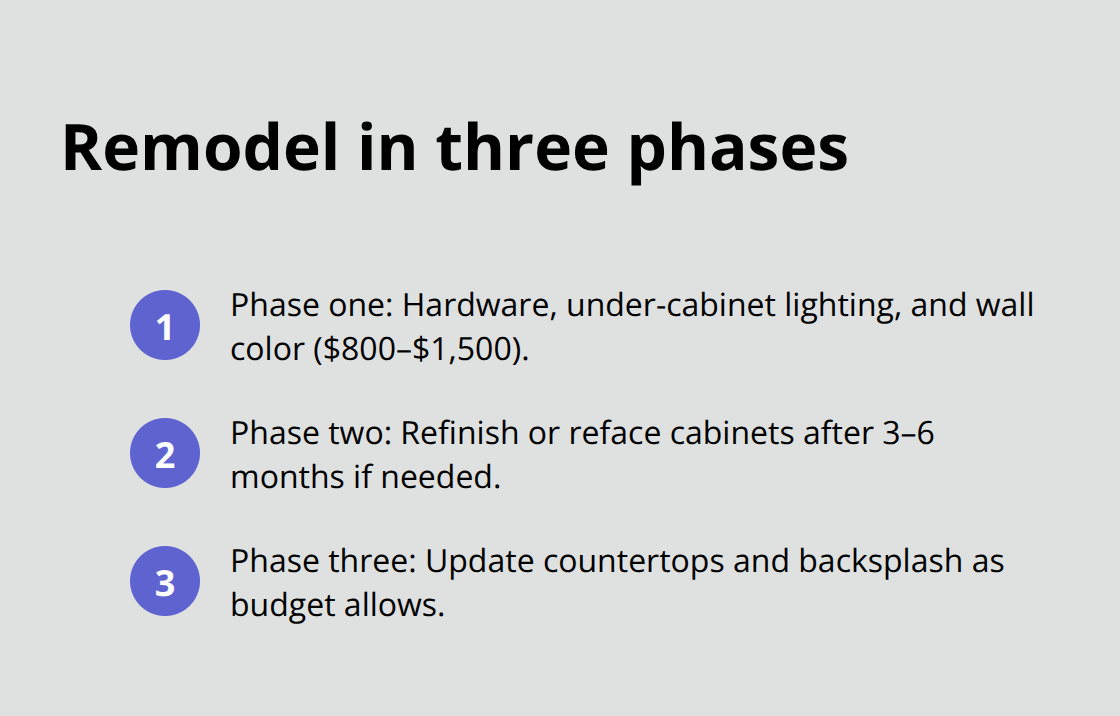
This approach prevents overinvesting in cabinet work you might not actually need and spreads costs across your annual budget rather than requiring a large lump sum upfront. Starting with lighting and hardware also gives you time to live with those changes and confirm your design direction before committing to permanent cabinet modifications. Each phase builds on the previous one, allowing you to pause, evaluate, and adjust your priorities based on real results rather than theoretical expectations.
Final Thoughts
Oak kitchen cabinet remodel ideas work because they address what actually matters to homeowners: functionality, appearance, and cost. Homeowners in Arlington transformed their oak cabinets for under $1,500 by combining matte black hardware with warm LED under-cabinet lighting. Vienna residents refaced doors with new shaker profiles and updated to brushed nickel finishes, creating the visual impact of a complete overhaul while preserving their existing cabinet structure.
The finishes, hardware, and lighting surrounding your oak cabinets determine whether your kitchen reads as dated or current. Tysons homeowners learned that phasing their renovation across multiple quarters let them invest in high-impact updates first, then pause to evaluate whether additional cabinet work was actually necessary. Oak cabinets aren’t the problem-your intentional choices about metals, stain depth, and design direction control that outcome.
Contact Dzala General Contractor to discuss your oak cabinet remodel and receive a free estimate for your Arlington, Vienna, or Tysons kitchen. Our team manages the structural and electrical work that requires professional expertise while helping you prioritize where your budget delivers the most impact. Your kitchen transformation starts with understanding what you’re working with and making deliberate choices about what to update first.